Click the Strips menu in the Console view and choose the desired channel strip type.
The controls displayed in a channel strip vary according to the channel strip type. Channel strip controls are grouped into various modules that can be shown or hidden. The following modules and controls are available.
|
|
|
|
|
|
|
|
|
|
|
|
|
|
|
|
|
|
|
|
The change in velocity (volume) that will be applied to notes in the track on playback; ranges from –127 to +127.
|
|
|
|
|
|
|
|
Note: The Input Pan control is not visible in narrow channel strips.
|
|
|
|
|
|
ProChannel (Producer only)
|
ProChannel (Producer only)
|
ProChannel is an extended channel strip that provides high-quality Compressor, Equalizer, and Tube saturation processing for each channel. See ProChannel (Producer only).
Note: The ProChannel EQ plot is not visible in narrow channel strips.
|
|
|
|
|
|
EQ Plot (Studio and Essential only)
|
|
|
|
|
|
|
|
|
|
|
|
|
|
|
|
|
|
|
|
|
|
|
|
|
|
|
|
|
|
|
|
|
|
|
|
Note: The Send Pan control is not visible in narrow channel strips.
|
|
|
|
|
|
|
|
Sends the signal to the bus prior to the track’s volume fader; post means the Send signal goes to the bus after the volume fader.
|
|
|
|
|
|
|
|
|
|
|
|
|
|
|
|
|
|
|
|
|
|
|
|
|
|
|
|
|
|
|
|
|
|
|
|
|
|
|
|
|
Note: The Phase Invert control is not visible in narrow channel strips.
|
|
|
|
|
|
|
|
A switch that determines whether a track’s signal enters an effect or chain of effects as mono or stereo, regardless of the nature of the track.
Note: The Mono/Stereo control is not visible in narrow channel strips.
|
|
|
|
|
|
|
|
Note: The Read Automation control is not visible in narrow channel strips.
|
|
|
|
|
|
|
|
Note: The Write Automation control is not visible in narrow channel strips.
|
|
|
|
|
|
|
|
|
|
|
|
|
|
|
|
|
|
|
|
|
|
|
|
|
|
|
|
|
|
|
|
|
|
|
|
|
|
|
|
|
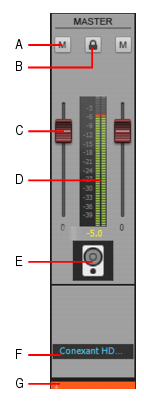
The stereo distribution of the output, ranging from 100% left (hard left) to 100% right (hard right); a value of “C” indicates sound that is centered left-to-right. On stereo tracks, pan acts as balance. For surround panners, the signal is sent to multiple speakers at points along a circle.
|
|
|
|
|
|
|
|
|
The current volume level for the track, ranging from -INF (silent) to +6 dB (maximum volume). The recording and playback levels are displayed in the Playback and Record meters.
|
|
|
|
|
|
|
|
Main out faders can be linked using the Link button  . This allows you to adjust both the left and right channel at the same time.
|
|
|
|
|
|
|
|
The recording and playback levels are displayed in the Playback and Record meters. For MIDI tracks, the meter shows MIDI activity and velocity.
|
|
|
|
|
|
|
|
The peak meter value updates during playback to show the highest peak level reached.
|
|
|
|
|
|
|
|
|
Track icons allow you to quickly identify a track’s contents by instrument. You can assign a new track icon, create your own track icons, and save an icon as part of a track template.
|
|
|
|
|
|
|
|
|
|
|
|
|
|
|
|
|
|
|
|
|
|
|
|
|
|
|
|
|
|
|
|
|
|
|
A name that you assign the track for easy reference. Note that if you do not assign a name to a track, the default name is the track number. This track number will change if you change the order of your tracks. You can click the Track Name control to select any available track, bus or main to display in the Track Inspector.
|
|
|
|
|
|
|
|
|
The colored WAI bar shows which tracks and/or buses are currently being controlled by a controller/surface. Each controller/surface uses a different color. For details, see The WAI display.
|
|
|
|
|
|
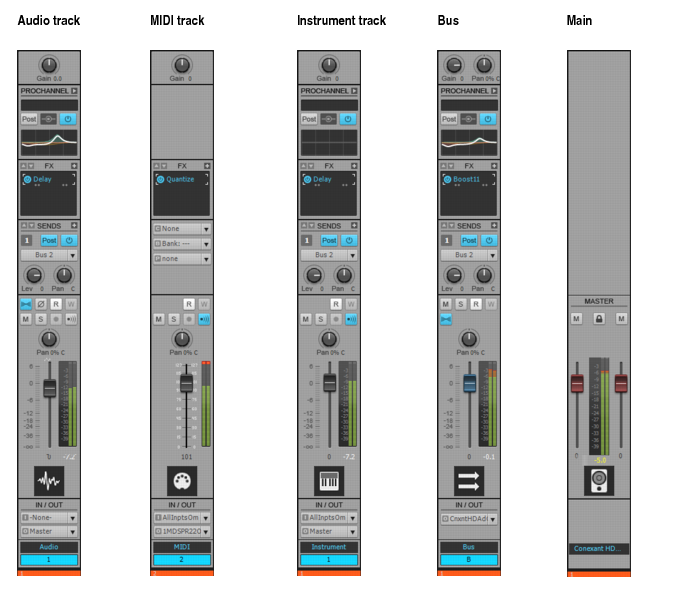
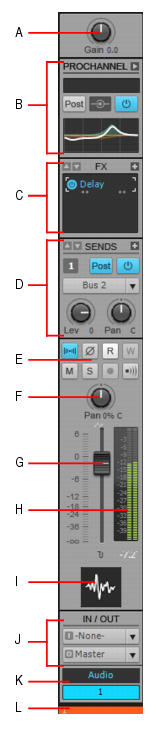
A. Input gain
B. ProChannel (Producer only)
C. Effects bin
D. Sends
E. Mute, Solo, Arm, Input Echo, Phase Invert, Stereo Interleave, Read Automation, Write Automation
F. Pan
G. Volume
H. Meter
I. Track icon
J. Input and output
K. Track name and number
L. WAI display
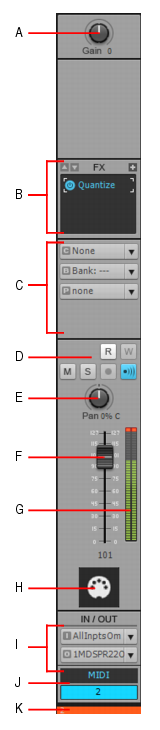
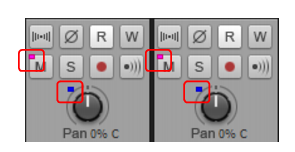
A. Velocity trim
B. Effects bin
C. Channel/Bank/Patch
D. Mute, Solo, Arm, Input Echo, Read Automation, Write Automation
E. Pan
F. Volume
G. Meter
H. Track icon
I. Input and output
J. Track name and number
K. WAI display
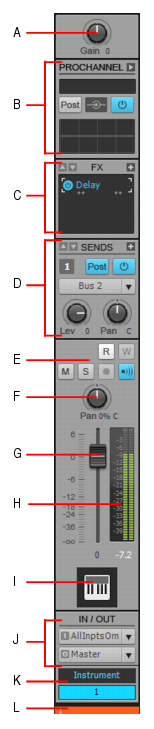
A. Input gain
B. ProChannel (Producer only)
C. Effects bin
D. Sends
E. Mute, Solo, Arm, Input Echo, Read Automation, Write Automation
F. Pan
G. Volume
H. Meter
I. Track icon
J. Input and output
K. Track name and number
L. WAI display
A. Input gain and pan
B. ProChannel (Producer only)
C. Effects bin
D. Sends
E. Mute, Solo, Read Automation, Write Automation
F. Pan
G. Volume
H. Meter
I. Bus Icon
J. Output
K. Bus name and letter
L. WAI display
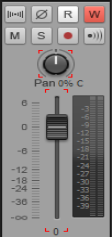
A red rectangle outlines any controls that are armed for automation writing. You can write enable the entire channel strip, or individual controls.